Plesk
This guide explains how to deploy a Brezel instance to a virtual server managed by Plesk.
For this guide, we assume the base domain is called example.io and Brezel will be accessible under brezel.example.io.
The example IP of Plesk is given as 5.35.243.342.
Prerequisites
- Plesk >= 18.0.45
- Ubuntu or Debian
- GitLab repository for your Brezel instance
1. Add DNS records
Variant 1: Plesk controls the DNS Zone
Check whether you control the example.io authoritative DNS zone, or at least the brezel.example.io zone, if one was set up for you.
You can check this using the MXToolBox SuperTool:
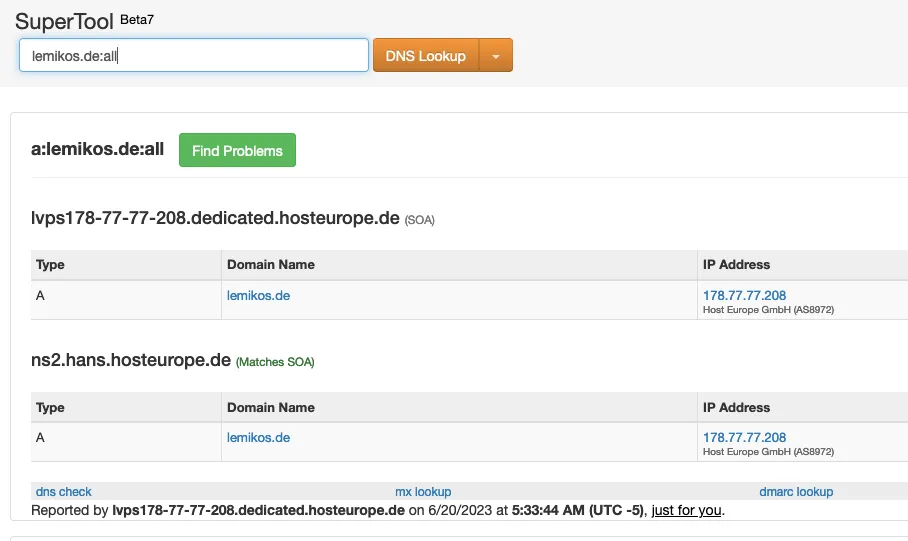
If one of the listed SOAs is your Plesk hostname (example.io or lvps178-77-77-208.dedicated.hosteurope.de), Plesk controls the DNS zone.
This means that DNS records for the subdomains you create in the next steps are automatically managed by Plesk.
Variant 2: External DNS
If Plesk does not control the DNS zone, your domain provider probably is. Check your provider using the MXToolBox SuperTool. Login to your external DNS provider and add the following DNS records (replace the bold values with your use case):
| Name | Type | Value |
|---|---|---|
| brezel.example.io | A | 5.35.243.342 |
| *.brezel.example.io | A | 5.35.243.342 |
2. Add the SPA domain
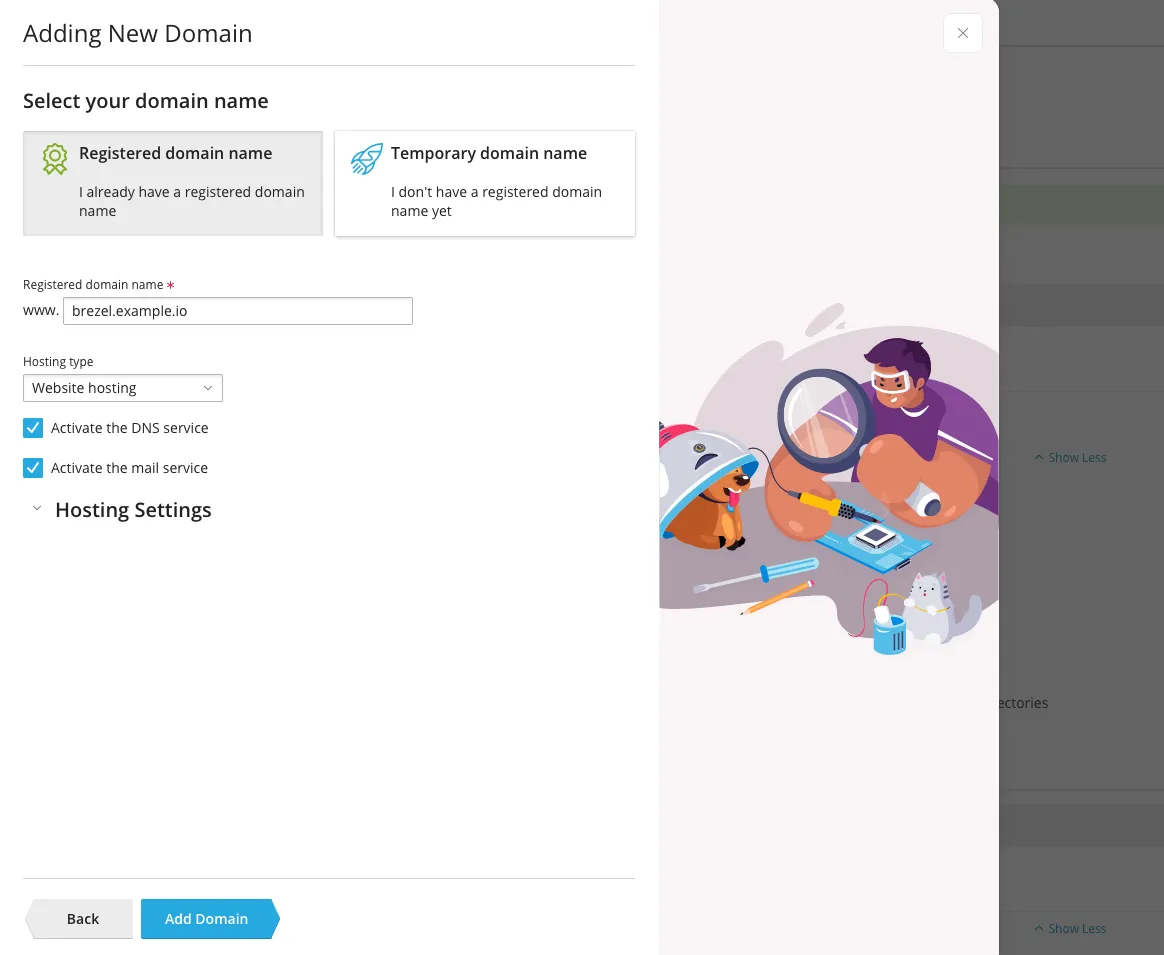
In Plesk, go to Domains and click on Add Domain. Choose the domain under which you wish to access the frontend of your Brezel instance. If You use DNS Variant 1, check Activate the DNS service. Click on Add Domain.
Configure access
On the created subdomain, go to Web Hosting Access and configure a system user.
Choose a username (brezel), generate a password, and set Access to the server over SSH to /bin/bash.
Secure the SPA domain
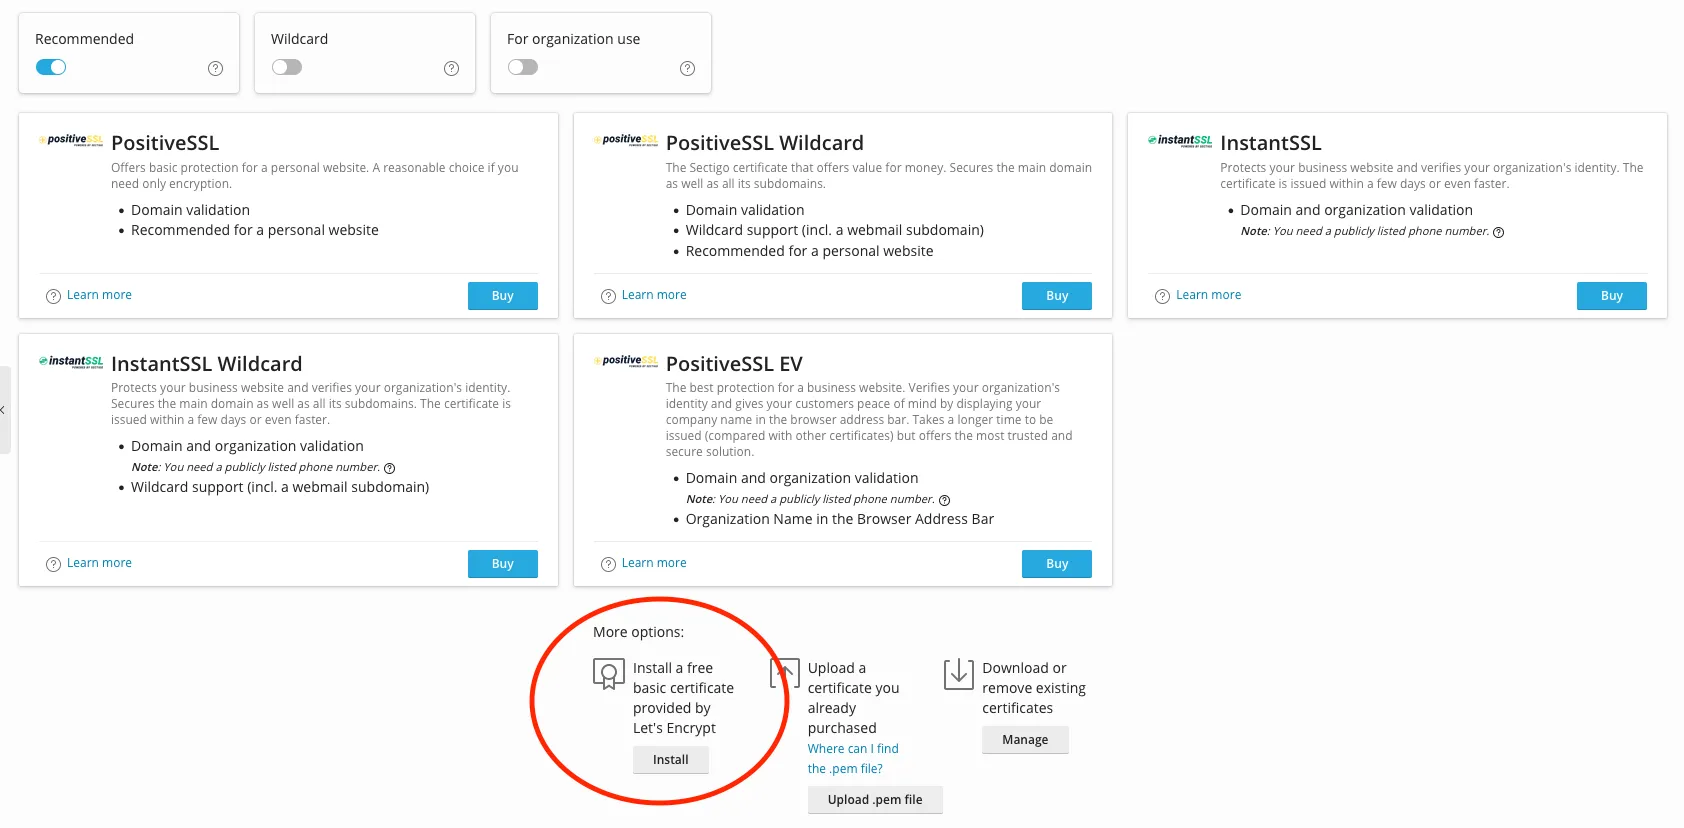
Go to SSL/TLS Certificates and install a free Let’s Encrypt certificate for your domain.
Set the hosting entrypoint
Click on Hosting Settings.
In the Document root field, enter the path to the dist directory of your instance:
api.brezel.example.io/dist3. Add the API domain
In Plesk, go to Domains and click on Add subdomain.
Add the subdomain api.brezel.example.io and click OK.
PHP settings
On the subdomain page, go to PHP Settings and choose the highest available PHP 7.4 version.
In the settings for PHP-FPM, ensure that the max_children setting is high enough for your needs.
If you have many users, 10 (default) might not be enough.
Secure the API domain
Go to SSL/TLS Certificates and install a free Let’s Encrypt certificate for the API domain.
Set the hosting entrypoint
Click on Hosting Settings.
In the Document root field, enter the path to the public directory of your instance:
api.brezel.example.io/publicAdd the database
On Databases, click on Add Database. Use the following settings:
| Name | Value |
|---|---|
| Database name | brezel |
| Related site | api.brezel.example.io |
| Database user name | brezel |
| Password | (Click Generate) |
| User has access to all databases within the selected subscription | ✅ |
| Access control | Allow local connections only |
Click on OK.
4. Connect the server to GitLab
The Brezel instance will be deployed to the API subdomain.
The SPA domain will receive the contents of the minified frontend found in the dist/ folder.
Create SSH keys for GitLab
Login to the server using SSH and the credentials you defined in “Configure access”:
ssh brezel@brezel.example.ioGenerate an RSA key pair:
ssh-keygen -b 4096This will output:
Generating public/private rsa key pair.Enter file in which to save the key (/var/www/vhosts/brezel.example.io/.ssh/id_rsa):The path is fine. Hit enter.
Created directory '/var/www/vhosts/brezel.example.io/.ssh'.Enter passphrase (empty for no passphrase):No passphrase. Hit enter.
Enter same passphrase again:Hit enter. It will then output something like this:
Your identification has been saved in /var/www/vhosts/brezel.example.io/.ssh/id_rsa.Your public key has been saved in /var/www/vhosts/brezel.example.io/.ssh/id_rsa.pub.The key fingerprint is:SHA256:hcsvjIXxM8ZS16X3IHIoGFwPSHr5Cjw35HOIZMEIW1c brezel@lvps5-35-243-342.dedicated.hosteurope.deThe key's randomart image is:+---[RSA 4096]----+|...oo+Eoo . || o...oo+ + o o ||. + * + * = o || + = X = o o o || = O S .|| + @ + || o o . || . || |+----[SHA256]-----+Now, go to GitLab, to the repository if your Brezel instance and go to Settings > Repository > Deploy Keys.
We want our server to be able to read from the GitLab repository.
Paste the contents of ~/.ssh/id_rsa.pub to the Key field. Give it a meaningful title like Production [brezel.example.io].
Clone the repository
First, delete the target directory that Plesk created:
rm -rf concepts.example.brezel.ioThen, clone the instance repository:
git clone git@gitlab.kiwis-and-brownies.de:kibro/basedonbrezel/example.git concepts.example.brezel.io5. Set up Brezel
Install composer and do
mv composer.phar ~/bin/composerEnter your private package credentials:
/opt/plesk/php/7.4/bin/php ~/bin/composer config --auth gitlab-token.gitlab.kiwis-and-brownies.de $PACKAGE_TOKEN_USER "$PACKAGE_TOKEN"Then, install dependencies:
/opt/plesk/php/7.4/bin/php ~/bin/composer installNext, configure your environment as outlined in Getting started.
If the database credentials were set up, you can initialize the instance with
/opt/plesk/php/7.4/bin/php bakery initNow, you can add your system
/opt/plesk/php/7.4/bin/php bakery system create exampleAnd fill it with your config:
/opt/plesk/php/7.4/bin/php bakery apply/opt/plesk/php/7.4/bin/php bakery load6. Set up Brezel SPA
Follow the SPA instructions in the Pipeline guide.
7. Set up the pipeline
Follow the Pipeline guide.
8. Install and configure supervisor
For async workflows and other background jobs to work, we need to install supervisor.
apt-get updateapt-get install supervisorMake sure the following entries are in your .env:
BREZEL_JOBS_SUPERVISOR_COMMAND='/opt/plesk/php/7.4/bin/php bakery work --tries=1'Reinitialize Brezel:
/opt/plesk/php/7.4/bin/php bakery initThen start supervisor in your instance directory with:
supervisord -c supervisord.confCheck that all jobs are up and running:
supervisorctl statusTroubleshooting
Getting ACCESS DENIED when trying to run php bakery system create example
If you get
SQLSTATE[42000]: Syntax error or access violation: 1227 Access denied; you need (at least one of) the CREATE USER privilege(s) for this operationthen this means that the database user you created has insufficient permissions to create (users for) system databases. In this case, you have to options:
Variant 1
If you have root privileges, you can give the brezel user SUPER privileges:
GRANT SUPER ON *.* TO 'brezel'@'localhost';FLUSH PRIVILEGES;Variant 2
You must manually create a new user and system database and tell Brezel these credentials. First, delete the system in case it was partly created:
/opt/plesk/php/7.4/bin/php bakery system delete exampleThis may spew out errors, but the necessary job is done.
Next, go to Databases and click on Add database. Use the following settings:
| Name | Value |
|---|---|
| Database name | brezel_example |
| Related site | api.brezel.example.io |
| Database user name | brezel_example |
| Password | (Click Generate) |
| User has access to all databases within the selected subscription | ❌ |
| Access control | Allow local connections only |
Click on OK.
Next, go to your system directory systems/example and create a new file called .env:
MANAGE_CONNECTION=falseDB_DATABASE=brezel_exampleDB_USER=brezel_exampleDB_PASSWORD="<password>"This tells Brezel not to manage the creation and deletion of system databases automatically but to use a pre-defined database.
Now, you can create the system:
/opt/plesk/php/7.4/bin/php bakery system create exampleSyntax error relating to JSON and MariaDB
If you receive an error like this:
SQLSTATE[42000]: Syntax error or access violation: 1064 You have an error in your SQL syntax; check the concepts that corresponds to your MariaDB server version for the right syntax to use near 'json null, `pr ovide` json null, `active` tinyint(1) not null default '1', `async' at line 1 (SQL: create table `workflows` (`id` bigint unsigned not null auto_increment primary key, `created_at` timestamp null, `updated_a t` timestamp null, `deleted_at` timestamp null, `title` varchar(191) not null, `description` longtext null, `require` json null, `provide` json null, `active` tinyint(1) not null default '1', `async` tinyint (1) not null default '1') default character set utf8mb4 collate 'utf8mb4_unicode_ci')It means your MariaDB version is not up-to-date. You need at least MySQL 8+ or MariaDB 10.5.2+. Update MariaDB using this guide.