Roles and Permissions
The role-based access control system (RBAC) in Brezel is designed to give you fine-grained control over who can do what in each module. This guide will help you understand how permissions work and how to manage them.
Root user
Section titled “Root user”Users with "root": true in their configuration have full access to all modules and entities,
as well as the ability to create and manage workflows.
If you copied the default configuration
from the Brezel repository,
the root user is usually the first user created in the system.
You must set the root user in the .bake configuration file like this:
{ "resource_users": "root_user", "resource": { "module": "users", "client": "${resource_client.global_client}", "root": true, "fields": { "name": "Root user", "email": "root@my-company.com", "password": "secret" } }}Users have no permissions by default. You must assign them to roles to give them access to modules and entities.
Each role has a matrix of permissions that define what users can do in each module. When you create a new user, you assign them to one or more roles to give them access to the modules and entities they need. Operations that require permissions are protected by the system and will return an error if the user does not have the necessary permissions, return only the data the user is allowed to see, or silently prevent the user from performing the operation (e.g. by not overwriting a field).
You can add role modules to Brezel using .bake configuration files:
[{ "resource_module": "roles", "resource": { "identifier": "roles", "type": "roles", "icon": "user-group", "title": "name" }}]Roles are added to users by setting the roles field either in the UI, or in the user configuration:
[{ "resource_entity": "users", "resource": { "module": "users", "fields": { "name": "Accountant", "email": "test@example.com", "password": "secret", "roles": ["${resource_entity.accountant}"] } }}]Permissions
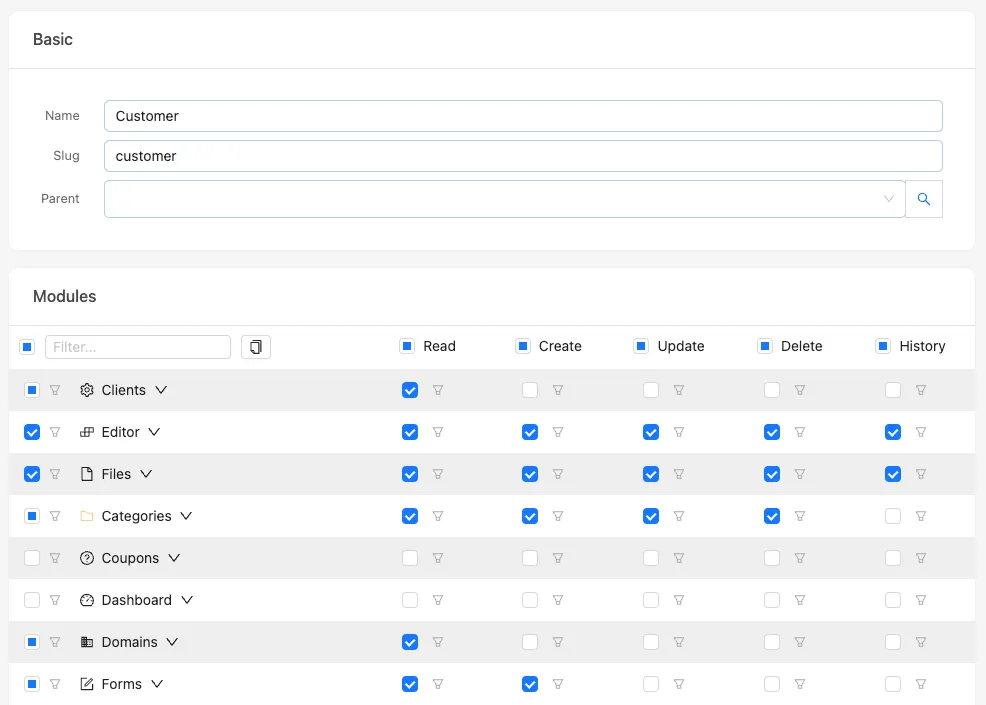
Section titled “Permissions”Here is a simple approximation of how the Brezel UI would display role permissions:
| [] | Module | Read | Create | Update | Delete | History |
|---|---|---|---|---|---|---|
| ✅ | Invoices | ✅ | ✅ | ✅ | ✅ | ✅ |
| ⏺️ | Products | ✅ | ❌ | ❌ | ✅ | ✅ |
| ❌ | Customers | ❌ | ❌ | ❌ | ❌ | ❌ |
As you can see, there are five operations: create, read, update, delete, and history.
The symbols in the table represent the permissions for each operation: ✅ means the operation is allowed, ❌ means it is denied, and ⏺️ means it is partially allowed.
You can set permissions per operation or per module. If you set permissions per operation, you can allow or deny each operation individually. In the example above, users can create, read, update, and delete invoices, but they can only read products. If you set permissions per module, you can allow or deny all operations at once.
The above matrix corresponds to the following configuration:
[{ "resource_entity": "roles", "resource": { "module": "roles", "fields": { "name": "Accountant", "slug": "accountant", "modules": { "invoices": true, "products": { "create": false, "read": true, "update": true, "delete": false, "history": true, "fields": true }, "customers": { "create": false, "read": false, "update": false, "delete": false, "history": false, "fields": true } } } }}]Per-field permissions
Section titled “Per-field permissions”In addition to module permissions, you can also set permissions per field. These permissions are applied on top of module permissions, meaning that if a user does not have permission to read a field, they will not be able to read it even if they have permission to read the module.
[{ "resource_entity": "roles", "resource": { "module": "roles", "fields": { "name": "Accountant", "slug": "accountant", "modules": { "invoices": true, "products": { "create": false, "read": true, "update": false, "delete": false, "history": true, "fields": { "price": { "read": true, "update": false } } }, "customers": { "create": false, "read": false, "update": false, "delete": false, "history": false, "fields": true } } } }}]The configuration above allows users with the Accountant role to read the price field in the products module, but not update it.
All other fields in the products module are inaccessible to users with this role, as they are not explicitly allowed.
Per-entity permissions New
Section titled “Per-entity permissions ”Added in: brezel/api@0.96.0
If you need to set permissions per entity, you can do so by adding filters to an operation configuration.
These filters act as WHERE clause in the SQL query that retrieves the entities for read, update, and delete operations.
[{ "resource_entity": "roles", "resource": { "module": "roles", "fields": { "name": "Accountant", "slug": "accountant", "modules": { "invoices": true, "products": { "create": false, "read": { "filter": [ [ { "field": "price", "operator": ">", "value": 100 }, { "field": "price", "operator": "<", "recipe": "user().max_price" } ] ] }, "update": false, "delete": false, "history": true, "fields": true }, "customers": { "create": false, "read": false, "update": false, "delete": false, "history": false, "fields": true } } } }}]In the example above, users with the Accountant role can only read products with a price between 100 and the value of the max_price field in their user entity.
The following variables are available in recipes with the permissions configuration context:
role: The current role entitymodule: The current moduleaction: The current action (read, create, update, delete, history)user: The current user entity. It is also available as the knownuser()function.
You can also set permissions per entity for a whole module by setting the filters key in the role’s module configuration:
[{ "resource_entity": "roles", "resource": { "module": "roles", "fields": { "name": "Accountant", "slug": "accountant", "modules": { "invoices": true, "products": { "create": false, "read": true, "update": false, "delete": false, "history": true, "fields": true, "filter": [ [ { "field": "price", "operator": ">", "value": 100 } ] ] }, "customers": { "create": false, "read": false, "update": false, "delete": false, "history": false, "fields": true } } } }}]Policies New
Section titled “Policies ”Added in: brezel/api@0.96.0
Copying and pasting the same filters for multiple roles can be cumbersome. Instead, you can define a policy that contains the filters and reference it in the role configuration:
[{ "resource_entity": "roles", "resource": { "module": "roles", "fields": { "name": "Accountant", "slug": "accountant", "modules": { "invoices": true, "products": { "create": false, "read": { "policies": ["product_price_policy"] }, "update": false, "delete": false, "history": true, "fields": true }, "customers": { "create": false, "read": false, "update": false, "delete": false, "history": false, "fields": true } } } }}]In order for policies to work, you must first have a policies module defined in your configuration.
[{ "resource_module": "policies", "resource": { "identifier": "policies", "type": "policies", "icon": "lock", "title": "name" }}]Then, you can define the policy like this:
[{ "resource_entity": "policies", "resource": { "module": "policies", "fields": { "name": "product_price_policy", "policy": [ [ { "field": "price", "operator": ">", "value": 100 } ] ] } }}]Workflow policies
Section titled “Workflow policies”You can also set per-entity permissions using workflows. Especially in complex systems, workflows can be more flexible and powerful than roles.
To configure a workflow-based policy, you must create a new workflow and add one or more policy events to it:
event/policy: This event is triggered when the system checks permissions for a user. You can use this event to add filters to the permission check.event/policyRead: This event is triggered when the system checks permissions for a user to read an entity.event/policyUpdate: This event is triggered when the system checks permissions for a user to update an entity.event/policyDelete: This event is triggered when the system checks permissions for a user to delete an entity.
These events output a query object that you can modify to add filters, using query/where.
Hierarchical roles
Section titled “Hierarchical roles”Roles can be hierarchical, meaning that a role can inherit permissions from another role. This is useful when you have multiple roles with similar permissions, but one role has additional permissions.
To create a hierarchical role, you must set the parent key in the role configuration:
[{ "resource_entity": "roles", "resource": { "module": "roles", "fields": { "name": "Accountant", "slug": "accountant", "parent": "${resource_entity.manager}", "modules": { "invoices": true, "products": { "create": false, "read": true, "update": false, "delete": false, "history": true, "fields": true }, "customers": { "create": false, "read": false, "update": false, "delete": false, "history": false, "fields": true } } } }}]Per-client permissions
Section titled “Per-client permissions”Brezel is a multi-tenant system, so you can also define how modules and entities are shared between clients.
You do this in module configurations by setting the shared and global options:
[{ "resource_module": "pages", "resource": { "identifier": "pages", "type": "module", "icon": "file", "title": "name", "options": { "shared": true, "global": true } }}]Access to shared and global entities is determined by the client of the user. If a user is assigned to a client, they can normally only see entities of that client. However, if the entity is shared or global, they may see entities of other clients as well. Below is a table that shows the different scenarios:
| User Client | Entity Client | Shared | Global | Accessible | Comments |
|---|---|---|---|---|---|
| A | A | ❌ | ❌ | ✅ | Same clients |
| A | B | ❌ | ❌ | ❌ | Different clients |
| A | B | ❌ | ✅ | ❌ | B is not global, so “global” has no effect |
| A | B | ✅ | ❌ | ✅ | Shared entity |
| Cglobal | B | ❌ | ❌ | ✅ | Global has access to all clients |
| A | Cglobal | ❌ | ❌ | ❌ | Different clients |
| A | Cglobal | ❌ | ✅ | ✅ | Global entity |
| A | Cglobal | ✅ | ❌ | ✅ | Shared entity |
Note that role-based permissions are still respected, so clients can only see the data they are allowed to see. This can be used to further restrict access to shared and global entities based on other criteria.
Permissions in the Brezel UI
Section titled “Permissions in the Brezel UI”You can manage roles and permissions in the Brezel UI by navigating to the corresponding role module and editing the roles.
The UI will display a matrix of modules and operations, allowing you to set permissions per module or per operation.
When you are done, click the “Save” button to apply the changes. If you want to copy the permissions to your .bake configuration file, click the “Copy to clipboard” button.
It will copy the "modules" object to your clipboard, which you can paste into your .bake configuration file.